I am adding more to my east facing roof.
Semi DIY PV Installation. Comments Please
Re: Semi DIY PV Installation. Comments Please
That will soon change to,
I am adding more to my east facing roof.
I am adding more to my east facing roof.
19.6kW PV > 116MWh generated
Ripple 6.6kW Wind + 4.5kW PV > 34MWh generated
7 Other RE Coop's
105kWh EV storage
90kWh Home battery storage
40kWh Thermal storage
GSHP + A2A HP's
Rain water use > 530 m3
Ripple 6.6kW Wind + 4.5kW PV > 34MWh generated
7 Other RE Coop's
105kWh EV storage
90kWh Home battery storage
40kWh Thermal storage
GSHP + A2A HP's
Rain water use > 530 m3
Re: Semi DIY PV Installation. Comments Please
I wouldn't worry to much about your unitstrut - you will not get 70MPH winds in that sheltered spot. If you do get concerned about the amount of movement then as others have said a simple bit of "triangulation bracing will steady it.
As for "moving" it to the east roof, why not just ADD some to the east roof? and leave the new install where it is. You can never have too many panels - east facing is good for early morning generation while you are cooking breakfast!
"Sell" the canopy install to your wife as a summer sun shade, a nice cool spot in the garden! -
Re: Semi DIY PV Installation. Comments Please
Hi Smegal,
now that you’ve had a few weeks to get used to your system how is it behaving, are you more or less comfortable with the flex of the system ?
Moxi
now that you’ve had a few weeks to get used to your system how is it behaving, are you more or less comfortable with the flex of the system ?
Moxi
Re: Semi DIY PV Installation. Comments Please
Thank you for the question.
Well...
Since my posts, I asked three Structural Engineers at work. One during a call about something else, but he isn't the most pragmatic, so I asked another. Then while at the coffee machine at work, another asked me about my installation (there must have been some internal discussions). When I showed the third my photo's his responsor was "$h*t mate, that's a bit slender"
After speaking to the first two people I'd ordered the mounting gear to roof mount. That was a drama in itself. I opted for renusol mountings as they had an online designer that accounts for wind speed etc. Unfortunately, there seems to be a UK wide shortage of renusol mountings, I got really lucky and got the bits that I needed, but it took a LOT of searching, and buying components from a couple of suppliers.
Last Wednesday, my scaffold tower was delivered. On Friday, I installed the hooks, quite proud of myself, prior to that the only roofing I'd ever done was replacing one tile. On Saturday, the installation was moved and the unistrut demolished.
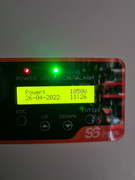
The installation is definitely compromised compared to the South Facing. I suspect the graph flatlining at 100W is indicative of significant shading.

On Friday, I also received a replacement for one of the walked on panels as there was some minor damage. I have to say I am happy with the supplier, and would happily recommend them.
If the supplier doesn't ask for the damaged one back (I don't expect them to if I'm honest, it'd cost more in shipping than the panel is worth), I am considering adding this to the install in portrait mode and installing tigo optimisers. I will also get some renusol right angled brackets and drop the install down a rail height. I currently have rails running across, then vertical rails mounted on to the horizontal rails. It makes the install sit higher than I'd like, but it was what came out of the calculator.
Hooks going in

Hooks up

Panels on

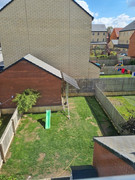
Looking down at the garden

The installation went reasonably well, with the only real headache being me trying to work out how to get the cable into the garage, I ended up adding deeper and wider notches round a hook and then bringing the cables through a lap in the roofing felt.
I am a little embarrassed about the change of direction, but It's all Learning From Experience. I'm grateful for all of the comments and advice I've received so far. It's been a steep learning curve.
Re: Semi DIY PV Installation. Comments Please
The new installation looks really good but don’t give up on the south facing option either - maybe something a bit more mobile so you can put it up when the gardens not in use and the weather is calm that may prove a fruitful route to additional power input to the house.
Moxi
Moxi
Re: Semi DIY PV Installation. Comments Please
Oof, you have a saints patience working around that neighbours garage in your garden scenario, (just catching up on this thread)
I thought there was going to be a bike store or similar arising from the placement (noting the kiddie bike helmet) as the excuse to the wife.
Unless I'm mistaken you said you'd recommend the supplier, but didn't give details as to who it was.
Who was the dngaf courier firm who clearly ignored the "no step" despatch note instruction?
What's the latest on the "presumed damaged" panel? ..going or staying?
Brand, model spec, yada yada?
Last edited by Mr Gus on Mon May 16, 2022 11:01 am, edited 1 time in total.
1906 ripplewatts @wind Turb-ine-erry
It's the wifes Tesla 3 (she lets me wash it)
Leaf 24
Celotex type insulation stuffed most places
Skip diver to the gentry
Austroflamm WBS
A finger of solar + shed full more
It's the wifes Tesla 3 (she lets me wash it)
Leaf 24
Celotex type insulation stuffed most places
Skip diver to the gentry
Austroflamm WBS
A finger of solar + shed full more
Re: Semi DIY PV Installation. Comments Please
Don't be, it makes for good reading & discussion, there's always plenty of "if I were to do it over again" ...well, you got busy & you did, that's commendable smegal.
1906 ripplewatts @wind Turb-ine-erry
It's the wifes Tesla 3 (she lets me wash it)
Leaf 24
Celotex type insulation stuffed most places
Skip diver to the gentry
Austroflamm WBS
A finger of solar + shed full more
It's the wifes Tesla 3 (she lets me wash it)
Leaf 24
Celotex type insulation stuffed most places
Skip diver to the gentry
Austroflamm WBS
A finger of solar + shed full more
Re: Semi DIY PV Installation. Comments Please
I should add, that I never asked my neighbour and he is a nice guy, (he's a Building Surveyor though, so would know if I damaged anything). I just didn't want to do things officially, so didn't bother.Mr Gus wrote: ↑Mon May 16, 2022 10:56 am Oof, you have a saints patience working around that neighbours garage in your garden scenario, (just catching up on this thread)
I thought there was going to be a bike store or similar arising from the placement (noting the kiddie bike helmet) as the excuse to the wife.
Unless I'm mistaken you said you'd recommend the supplier, but didn't give details as to who it was.
Who was the dngaf courier firm who clearly ignored the "no step" despatch note instruction?
What's the latest on the "presumed damaged" panel? ..going or staying?
Brand, model spec, yada yada?
The supplier is tradesparky. (I probably didn't give them much of a mention out of habit form the old place). I'm not sure who the courier were. Palletways rings a bell.
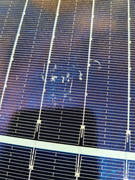
Still no news on whether they want it back. That's what they are JA Solar JAM60S20-380/MR 380W Silver Frame Half-Cell Module Mono Wish I'd paid the few pence extra for black ones. Also, there was minor damage, some scuffs and some marks. When shipped, my MC4 connectors were thrown in the shrink wrapping on top. It looks like the MC4s or something has damaged the surface.


Re: Semi DIY PV Installation. Comments Please
Clumsy, feckless bar-stewards!
Hope you sent pics, "for their insurance claim" (state you will hold the item for 14 days, "if they want it" for pick up if needed, thereafter it is to be disposed of as you deem fit, you have other jobs pending & materials arriving so will not have time nor space to retain it, not to into correspondence thereafter) ..covers you pretty well.
When I used to have claims assessors it was 3 month physical visits from slackards at royal mail, ..only due to my silver tongue, digital pics are generally enough these days for claims, esp ones involving fragile glass.
I had a sony floppy disk digital camera back then, email was pretty new, ..Wonder what that's worth now?
1906 ripplewatts @wind Turb-ine-erry
It's the wifes Tesla 3 (she lets me wash it)
Leaf 24
Celotex type insulation stuffed most places
Skip diver to the gentry
Austroflamm WBS
A finger of solar + shed full more
It's the wifes Tesla 3 (she lets me wash it)
Leaf 24
Celotex type insulation stuffed most places
Skip diver to the gentry
Austroflamm WBS
A finger of solar + shed full more
Re: Semi DIY PV Installation. Comments Please
I put the exact same panels on my shed last year. I hadn't considered the silver frame, but black would have looked better.
If I were you, I'd get some car polish on those scratches and get the panel up there!
If I were you, I'd get some car polish on those scratches and get the panel up there!
12x 340W JA Solar panels (4.08kWp)
3x 380W JA Solar panels (1.14kWp)
6x 2.4kWh Pylontech batteries (14.4kWh)
LuxPower inverter/charger
(Artist formally known as ******, well it should be obvious enough to those for whom such things are important.)
3x 380W JA Solar panels (1.14kWp)
6x 2.4kWh Pylontech batteries (14.4kWh)
LuxPower inverter/charger
(Artist formally known as ******, well it should be obvious enough to those for whom such things are important.)

