Starting out on my heat pump journey
Re: Starting out on my heat pump journey
I am lucky, my roof is flat concrete tiles, at a 30 degree pitch, very easy to work on, and to walk around on.
Re: Starting out on my heat pump journey
Well I managed to get one tile back in place and stapled but that was it for me, two others are both in gullies where the ladder and hooks cannot be positioned and the last tile is on the north roof two down from the ridge and too hard for me to reach with ladders etc so I decided it needs an expert who has the knowledge and the agility to traverse a steep slippery slate roof. 
Wife was relived when I came to my senses and opted out of the DIY fix.
Moxi
Wife was relived when I came to my senses and opted out of the DIY fix.
Moxi
Re: Starting out on my heat pump journey
Always better safe than sorry.Moxi wrote: ↑Mon May 12, 2025 10:13 am Well I managed to get one tile back in place and stapled but that was it for me, two others are both in gullies where the ladder and hooks cannot be positioned and the last tile is on the north roof two down from the ridge and too hard for me to reach with ladders etc so I decided it needs an expert who has the knowledge and the agility to traverse a steep slippery slate roof.
Wife was relived when I came to my senses and opted out of the DIY fix.
Moxi
My BUS upgrade has been approved, so now I need to ask do I need a buffer tank and is it possible to heat the DHW tank which is on the first floor. I have tended just to use the immersion as it is pretty cheap but seeing Ronski’s costs for hot water it doesn’t seem so cheap now
Mitsubishi Ecodan
ASHP 8.5kW x 2
12 x 460w Solar panels
9.5kWh GivEnergy
Batteries x 2
EVs x 4 240 kWh Batteries
Ripple 5.8 kW PV 0.547 kW Whitelaw Brae
ASHP 8.5kW x 2
12 x 460w Solar panels
9.5kWh GivEnergy
Batteries x 2
EVs x 4 240 kWh Batteries
Ripple 5.8 kW PV 0.547 kW Whitelaw Brae

Re: Starting out on my heat pump journey
Buffer tanks reduce efficiency in most applications. Unfortunately, the MCS guidelines were written by someone who didn't know what they were on about so buffers are strongly encouraged therein.Yuff wrote: ↑Mon May 12, 2025 10:36 amAlways better safe than sorry.Moxi wrote: ↑Mon May 12, 2025 10:13 am Well I managed to get one tile back in place and stapled but that was it for me, two others are both in gullies where the ladder and hooks cannot be positioned and the last tile is on the north roof two down from the ridge and too hard for me to reach with ladders etc so I decided it needs an expert who has the knowledge and the agility to traverse a steep slippery slate roof.
Wife was relived when I came to my senses and opted out of the DIY fix.
Moxi
My BUS upgrade has been approved, so now I need to ask do I need a buffer tank and is it possible to heat the DHW tank which is on the first floor. I have tended just to use the immersion as it is pretty cheap but seeing Ronski’s costs for hot water it doesn’t seem so cheap now
If you want "the grant" you'll need to go the the huge expense of plumbing your HP into your DHW system. However in most cases this is a waste of time!
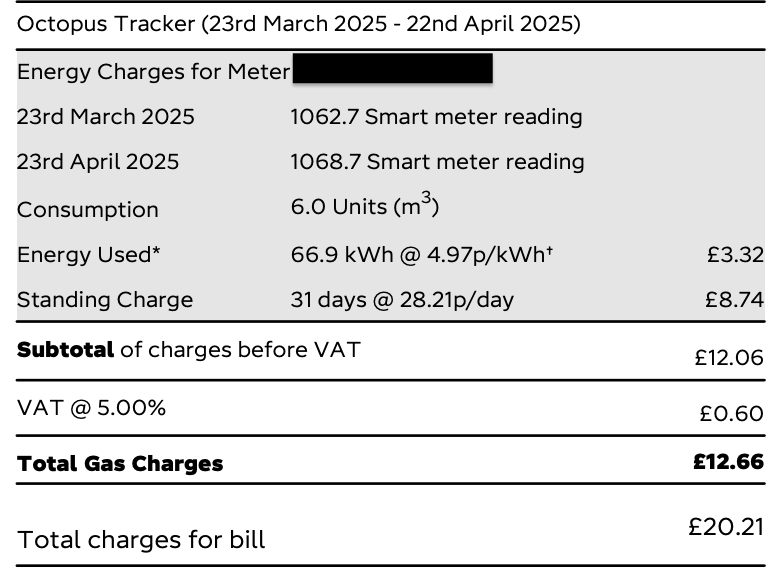
Below is my most recent Gas bill. My woefully inefficient gas combi consumed c. 67kWh of gas in the month. Even generously assuming 80% efficiency, that represents c.54kWh of heat. If I heated it with an immersion at 7p/kWh that'd cost £3.75.
You don't need to do CoP calculations to understand that paying £1000 for a new cylinder, and all the labour cost/disruption of new pipework, to understand that connecting your HP to your DHW is pointless!
12x 340W JA Solar panels (4.08kWp)
3x 380W JA Solar panels (1.14kWp)
6x 2.4kWh Pylontech batteries (14.4kWh)
LuxPower inverter/charger
(Artist formally known as ******, well it should be obvious enough to those for whom such things are important.)
3x 380W JA Solar panels (1.14kWp)
6x 2.4kWh Pylontech batteries (14.4kWh)
LuxPower inverter/charger
(Artist formally known as ******, well it should be obvious enough to those for whom such things are important.)
Re: Starting out on my heat pump journey
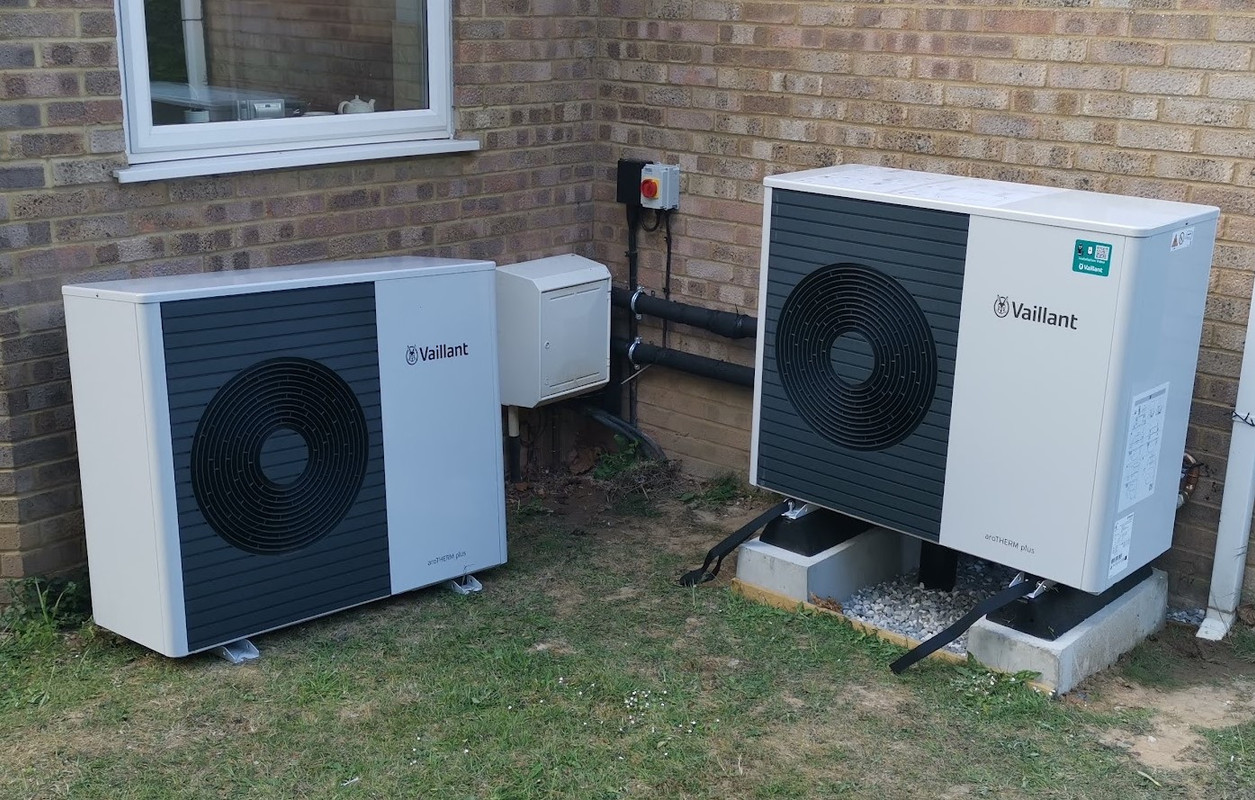
So, yesterday was heat pump replacement day, I had the day off work, the Heatgeek trained engineer and one of the trainee's arrived, I was told he was just for muscle to lift the heat pump, it was supposed to be the two experienced plumbers.
They did power flush the system, for about four hours, bang on some radiators but certainly not all, it certainly wasn't thorough. They altered the pipework behind the uniTower so that the feed and return is crossed over there, that means the outside is neater. They replumbed where the heating splits off in two directions, as they had a 22mm speedfit tee to connect to the pre-existing 22mm plastic, I had pointed out it would be better to make up a copper tee, and speed fit either side to the plastic. They also fitted an inline strainer, I had asked that one of the isolators be replaced with the type what has a built in strainer, you turn the isolator off and can remove the strainer without draining the system.
We set the app up yesterday, and he did tell me that I'd get an email requesting authorisation to monitor the heat pump.
This is where we were at yesterday, yes we did have hot water.
Just the main guy came today, to finish off, and commission the system, I was at work but the wife was home.
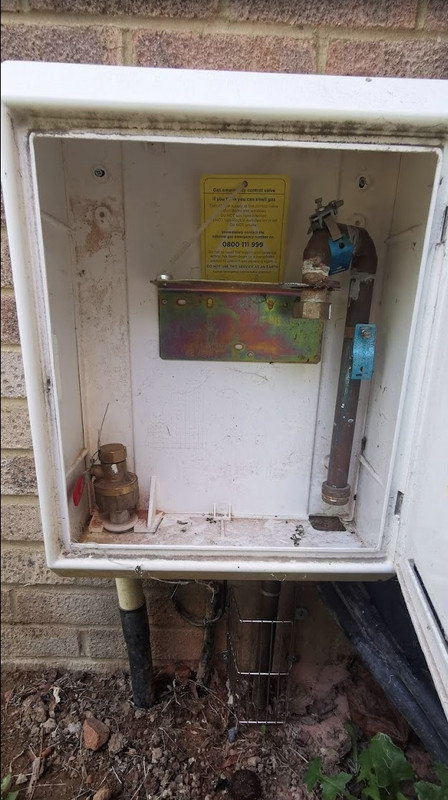
Also the Octopus engineer removed the gas meter
Accidently posted!
So we still have this on one elbow.
And who can spot problems here? This is looking straight down from above the isolators and antifreeze valves.
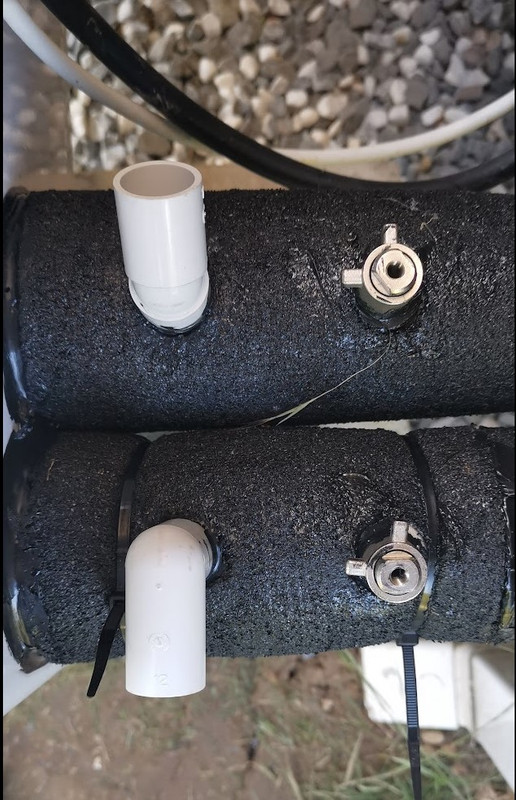
I've no idea if they added any additive, he said he'll add a little something yesterday, but who knows???
They did power flush the system, for about four hours, bang on some radiators but certainly not all, it certainly wasn't thorough. They altered the pipework behind the uniTower so that the feed and return is crossed over there, that means the outside is neater. They replumbed where the heating splits off in two directions, as they had a 22mm speedfit tee to connect to the pre-existing 22mm plastic, I had pointed out it would be better to make up a copper tee, and speed fit either side to the plastic. They also fitted an inline strainer, I had asked that one of the isolators be replaced with the type what has a built in strainer, you turn the isolator off and can remove the strainer without draining the system.
We set the app up yesterday, and he did tell me that I'd get an email requesting authorisation to monitor the heat pump.
This is where we were at yesterday, yes we did have hot water.
Just the main guy came today, to finish off, and commission the system, I was at work but the wife was home.
Also the Octopus engineer removed the gas meter
Accidently posted!
So we still have this on one elbow.
And who can spot problems here? This is looking straight down from above the isolators and antifreeze valves.
I've no idea if they added any additive, he said he'll add a little something yesterday, but who knows???
Re: Starting out on my heat pump journey
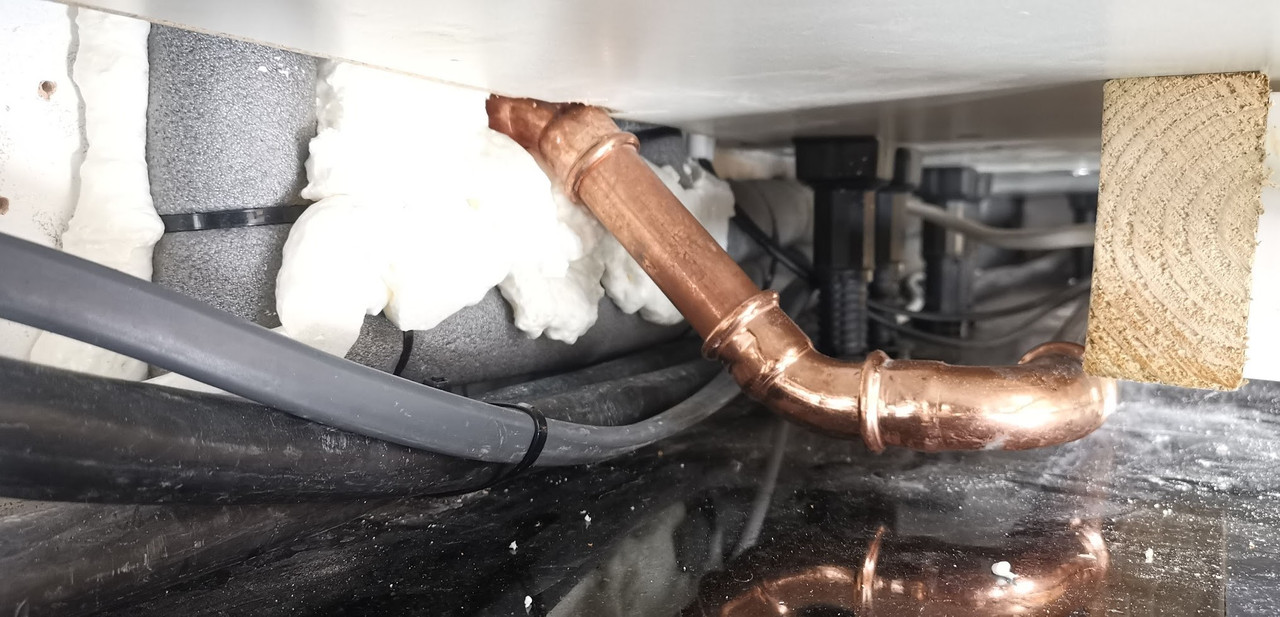
The vents on the above antifreeze valves are not proper vents, they are plastic pipe fittings, one is an 90 degree elbow, the other is a 45 degree elbow, and the fact it is pointing upwards means it will collect water and detritus. In the winter water may freeze, either way it will eventually get blocked, and then not let air in, if the antifreeze valves ever discharged the water. I've decided to put the above right myself, and redo a couple of bits of the insulation, as there is still some gaps, one elbow, and both antifreeze valves have gaps underneath.
Its almost 8 weeks since I removed the kitchen cabinets for the plumbing to be done, today I finally got the cooker tower unit back, along with the pull out larder unit. It was a tight fit, and I had to cut a little of the cabinet away to clear the discharge pipe, but it was a minor piece luckily.
Last weekend I tidied up the insulation behind the cupboards, and fitted the small cabinet back, I also squirted some low expansion expanding foam insulation, to improve the insulation on corners, junctions and where the pipe clips are, there was not enough space for the clamps that go around the insulation.
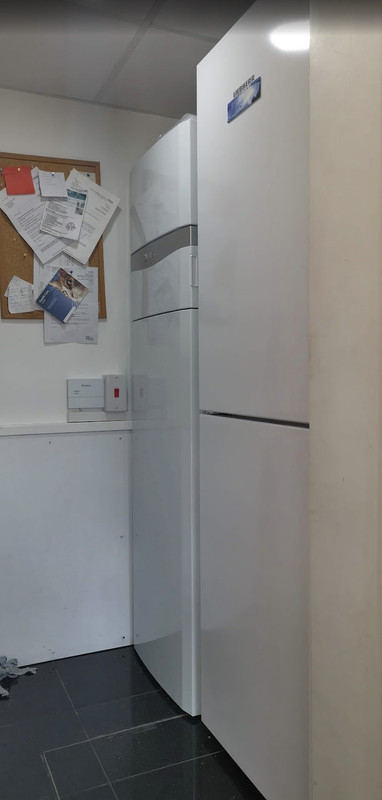
Tomorrow's job is to get the fridge freezer back in the utility room.
Its almost 8 weeks since I removed the kitchen cabinets for the plumbing to be done, today I finally got the cooker tower unit back, along with the pull out larder unit. It was a tight fit, and I had to cut a little of the cabinet away to clear the discharge pipe, but it was a minor piece luckily.
Last weekend I tidied up the insulation behind the cupboards, and fitted the small cabinet back, I also squirted some low expansion expanding foam insulation, to improve the insulation on corners, junctions and where the pipe clips are, there was not enough space for the clamps that go around the insulation.
Tomorrow's job is to get the fridge freezer back in the utility room.
Re: Starting out on my heat pump journey
https://www.bes.co.uk/class-o-adhesive- ... 15m-17548/
You get self adhesive tape that can be put over the joins to tidy them up..
Probably a good idea you doing the small snagging items, assuming they use this as an excuse if things go wrong..
You get self adhesive tape that can be put over the joins to tidy them up..
Probably a good idea you doing the small snagging items, assuming they use this as an excuse if things go wrong..
Re: Starting out on my heat pump journey
It was more the corners, where a combination of the crimp fittings and being a corner meant there were gaps in the insulation. Also where they'd had to use normal pipe clips they just leaked heat, but once covered in spray foam insulation they were cooler than the foam pipe insulation.
It's all hidden, so it just needed to be functional rather than look nice.
Compromises had to be made due to very tight space it had to be installed in, it could have been done better though, but that takes time.
The pipes are so tight to the wall, you'd never wrap tape around them, and it will eventually come unstuck.
Re: Starting out on my heat pump journey
Got the utility room back together yesterday, much more tricky to get the fridge freezer in there now, we had to take the doors off, as there is not the room to turn it through 90 degree's once in the room, it may have gone if I took the washing machine out, but that means taking the tumble dryer out as well.
The really annoying thing is that to get to the filter, the fridge freezer will need moving, they said there was no other option - I'm sure it could have been mounted higher to allow access from above, if I push the fridge tight against the wall, there may just be the space, but I doubt it. We'll find out next year.
The really annoying thing is that to get to the filter, the fridge freezer will need moving, they said there was no other option - I'm sure it could have been mounted higher to allow access from above, if I push the fridge tight against the wall, there may just be the space, but I doubt it. We'll find out next year.
Re: Starting out on my heat pump journey
What about putting the fridge freezer on a wooden dolly with castors to make moving it easy?