2nd A2A heat pump
Posted: Fri Sep 20, 2024 10:22 am
Inspired by Nowtys 'more renewable shenanigans' thread a while back I have now completed my second split A2A system install.
Pictures tell a thousand words and couldnt hope to match the original write up in anycase, so just a brief description and a few pictures from me.
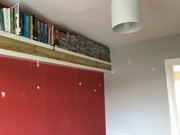
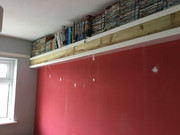
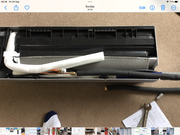
Bought a 3.5kw unit, they come with 4m of pipework, but i needed to run the refrigerant lines through an adjacent room so needed a 2m long extension, making a total piperun of 6m. Manufacturer says unit is precharged to cope with that so happy days. Cost of unit + additional pipe kit was £593.98. Refrigerant pipework is run at fairly high level around the room and will be boxed in to create high level book shelf (partly done at present so no piccies yet).
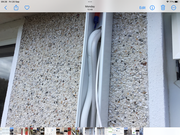
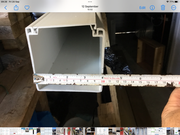
Dont like the look of pipework/cables down the outside wall of the house, so i sourced a 4x4" piece of electrical trunking for £30. Installed that to run from soffit board to ground level, as my power cable is running via the loft (im in a bungalow so thats easier to route) and enters through sofit board. Its BIG trunking but gives the advantage that when your pipes/cables/drain exit the core drilled hole through the cavity wall, you have more 'space' to bend the pipes without damaging them when making the required 90' bend. Also, as measuring the pipe distance exactly is a bit 'wooly' it gives you the ability to 'lose' any extra pipe by forming gentle waves within the trunking to lose a few inches if required. Should see that on one of the photos as the pipe descends, i just think it looks some much tidier if you see nothing when its finished. The whole external trunking was filled with exp foam afterwards to retain heat/protect etc.
My inverter is in my garage, and has an 'excess solar' socket wired into it that acts as a type of Marlec HW diverter, so adj my inverter i have a double socket fed from this facility, as well as a normal mains powered one fed from its own mcb right adjacent.
So my A2A heat pump isnt hard wired into the mains at any point. Its run off its own 2.5mm cable (effectively used as an extension lead), through the soffit, into the loft and along to the other end of the roofspace in continuous conduit (bright red to distinguish it from anything mains connected in the usual manner). This bright red conduit then ends up by the excess solar socket/mains socket and can be plugged into either. Sounds a bit weird, but gives me the ability to then use it from either power source. Mains or the inverter controlled battery SOC or timer settings - and as the unit isnt 'wired into' my house, id consider it an 'appliance' so no Part P required either.
Need to change the drainage pipe slightly, in that the top pipe (when operating in AC mode) condense needs teeing into the pipe below running (from the heat pump when heating) to my drain - thought id got a OF tee kicking about, but couldnt find it so will have to tee that in later. Nice little 5 mins job for the future. Used 21mm OF for these pipe runs, as we dont get ice etc down these parts, but in colder climes would look at upsizing to 32mm. Lost count of the amount of frozen boiler condense pipes ive had to sort in the past.
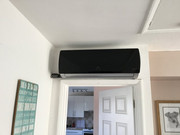
Anyway, thats about it. All runs fine, even though a bit closer to the ceiling than the instructions suggest. Few crappy pictures in no particular order, and thanks again to those that inspired. I'll let mrsResy tidy the door frame up - paintings a pink job!


Pictures tell a thousand words and couldnt hope to match the original write up in anycase, so just a brief description and a few pictures from me.
Bought a 3.5kw unit, they come with 4m of pipework, but i needed to run the refrigerant lines through an adjacent room so needed a 2m long extension, making a total piperun of 6m. Manufacturer says unit is precharged to cope with that so happy days. Cost of unit + additional pipe kit was £593.98. Refrigerant pipework is run at fairly high level around the room and will be boxed in to create high level book shelf (partly done at present so no piccies yet).
Dont like the look of pipework/cables down the outside wall of the house, so i sourced a 4x4" piece of electrical trunking for £30. Installed that to run from soffit board to ground level, as my power cable is running via the loft (im in a bungalow so thats easier to route) and enters through sofit board. Its BIG trunking but gives the advantage that when your pipes/cables/drain exit the core drilled hole through the cavity wall, you have more 'space' to bend the pipes without damaging them when making the required 90' bend. Also, as measuring the pipe distance exactly is a bit 'wooly' it gives you the ability to 'lose' any extra pipe by forming gentle waves within the trunking to lose a few inches if required. Should see that on one of the photos as the pipe descends, i just think it looks some much tidier if you see nothing when its finished. The whole external trunking was filled with exp foam afterwards to retain heat/protect etc.
My inverter is in my garage, and has an 'excess solar' socket wired into it that acts as a type of Marlec HW diverter, so adj my inverter i have a double socket fed from this facility, as well as a normal mains powered one fed from its own mcb right adjacent.
So my A2A heat pump isnt hard wired into the mains at any point. Its run off its own 2.5mm cable (effectively used as an extension lead), through the soffit, into the loft and along to the other end of the roofspace in continuous conduit (bright red to distinguish it from anything mains connected in the usual manner). This bright red conduit then ends up by the excess solar socket/mains socket and can be plugged into either. Sounds a bit weird, but gives me the ability to then use it from either power source. Mains or the inverter controlled battery SOC or timer settings - and as the unit isnt 'wired into' my house, id consider it an 'appliance' so no Part P required either.
Need to change the drainage pipe slightly, in that the top pipe (when operating in AC mode) condense needs teeing into the pipe below running (from the heat pump when heating) to my drain - thought id got a OF tee kicking about, but couldnt find it so will have to tee that in later. Nice little 5 mins job for the future. Used 21mm OF for these pipe runs, as we dont get ice etc down these parts, but in colder climes would look at upsizing to 32mm. Lost count of the amount of frozen boiler condense pipes ive had to sort in the past.
Anyway, thats about it. All runs fine, even though a bit closer to the ceiling than the instructions suggest. Few crappy pictures in no particular order, and thanks again to those that inspired. I'll let mrsResy tidy the door frame up - paintings a pink job!