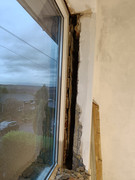
So I'm back on SWMBO's office today after a bit of a Christmas hiatus, and I've got to sorting the window reveals.
Needless to say she's loving how long this is all taking, after initially imagining a couple of weeks of wallpaper removal and painting during her time off, before being all set up in there by the new year.
Not being a fan of doing things twice (and inline with the general plans for the house) I instead decided to risk her wrath and made the decision to rewire, replace the flooring entirely with engineered timber complete with UFH, and sort out the window reveals ready for a new window in a year or so...
In typical mid century fashion, a load of smashed bricks and cement were lodged between the bricks and inner concrete blocks so first job was getting all of that out.
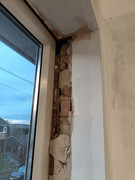
Now in terms of re-insulating and making good here I'm thinking of stuffing any cavity wall insulation gaps with thermafleece (as I've got quite a few rolls left over from a floor years ago), and then cutting some (foil-removed) celotex to glue into the gap with expanding foam, with a bit of PB on top, giving a small recess to fill with plaster, blending in with what's existing.
Does this make sense, or is there something else I should be considering here?
Making the window reveal smaller by chopping back to block, insulating the whole width and then re-plastering seems a lot of work, and unnecessary as the internal blocks shouldn't be cold. There won't be any internal wall insulation happening generally.
Window reveals - thermal bridging removal and making good.
-
- Posts: 28
- Joined: Tue Jan 04, 2022 8:34 pm
- Location: Leeds
Re: Window reveals - thermal bridging removal and making good.
Sounds like a decent plan although that part of cavity won't be able to breath if you overpack it and I'm not sure I'd use felt type insulation so close to a temp change Area(window). I'd go with celotex and a low expansion foam. Might try to leave a small airgap too. Hard to see the depth you are working with
19.7kW PV SE, VI, HM, EN & DW
Ripple 7kW WT & Gen to date 19MWh
42kWh LFPO4 storage
95kWh Heater storage
12kWh 210ltr HWT.
73kWh HI5
Deep insulation, air leak ct'd home
Zoned GCH & Hive 2
WBSx2
Low energy bulbs
Veg patches & fruit trees
Ripple 7kW WT & Gen to date 19MWh
42kWh LFPO4 storage
95kWh Heater storage
12kWh 210ltr HWT.
73kWh HI5
Deep insulation, air leak ct'd home
Zoned GCH & Hive 2
WBSx2
Low energy bulbs
Veg patches & fruit trees
-
- Posts: 28
- Joined: Tue Jan 04, 2022 8:34 pm
- Location: Leeds
Re: Window reveals - thermal bridging removal and making good.
The depth there is about 4-6 inches, and there's a bit more on the other side.
My thinking with the wool was that it would breath, at least as well as the loose fill cavity wall insulation that's already there.
Ideally I'd perhaps stick the celotex in, and then fill behind with loose fill, but then I'd have to work out where to get quite a small quantity.
My thinking with the wool was that it would breath, at least as well as the loose fill cavity wall insulation that's already there.
Ideally I'd perhaps stick the celotex in, and then fill behind with loose fill, but then I'd have to work out where to get quite a small quantity.
Re: Window reveals - thermal bridging removal and making good.
I see where you are coming from. Have to be sure there is no moisture ingress before using wool type insulation. Most folk say a no to introducing it to an external wall. That's a decent depth to work with.snootsandfruits wrote: ↑Thu Jan 06, 2022 5:38 pm The depth there is about 4-6 inches, and there's a bit more on the other side.
My thinking with the wool was that it would breath, at least as well as the loose fill cavity wall insulation that's already there.
Ideally I'd perhaps stick the celotex in, and then fill behind with loose fill, but then I'd have to work out where to get quite a small quantity.
19.7kW PV SE, VI, HM, EN & DW
Ripple 7kW WT & Gen to date 19MWh
42kWh LFPO4 storage
95kWh Heater storage
12kWh 210ltr HWT.
73kWh HI5
Deep insulation, air leak ct'd home
Zoned GCH & Hive 2
WBSx2
Low energy bulbs
Veg patches & fruit trees
Ripple 7kW WT & Gen to date 19MWh
42kWh LFPO4 storage
95kWh Heater storage
12kWh 210ltr HWT.
73kWh HI5
Deep insulation, air leak ct'd home
Zoned GCH & Hive 2
WBSx2
Low energy bulbs
Veg patches & fruit trees
-
- Posts: 28
- Joined: Tue Jan 04, 2022 8:34 pm
- Location: Leeds
Re: Window reveals - thermal bridging removal and making good.
Mmm, yes, well the wall seems sound, no water ingress so far but I'll keep it in mind.
I think the existing cavity wall insulation is cellulose anyway which would of course also be problematic if there was any water ingress.
The utopian plan is external wall insulation down the line, but who knows how many years off that might be.
I think the existing cavity wall insulation is cellulose anyway which would of course also be problematic if there was any water ingress.
The utopian plan is external wall insulation down the line, but who knows how many years off that might be.
Re: Window reveals - thermal bridging removal and making good.
Bit of a late reply, but yes. I think this is a good idea, and it's exactly what I did a few years ago, except that I also put 20mm of PUR/PIR on the reveal, covering part of the D/G frame, and made sure that was airsealed with tape before putting the plasterboard on. If you are really spendy you could put in some aerogel as this is one place where it's worth considering.
The point here is that cutting out the brick from the cavity removes the thermal bridge of the inner leaf to the outer leaf, but with the window mounted in the external leaf ( as yours appears to be and mine was), there is still a nasty bridge through that brick round the side of the frame. So you need some reveal insulation to connect the window/frame with the cavity insulation and block the bridge/prevent condensation.
Ideally you'd move the windows back into line with the cavity insulation as that will produce a significantly better psi-value, but that's possibly more work than you want now (e.g new sills needed), and is best done when window upgrades are occurring. (I did eventually, some years later, get new 3G windows so took the opportunity to move them back in-line with the cavity).
It looks like you probably have 50mm of window frame to play with. If you can hide most of that under the reveal insulation+plasterboard you will have a significantly better building. No insulation at all is a bad plan as the back corner of that external brick will get cold and condensation will run down onto your (internal) windowcills on cold days.
DIY deep 1960's house retrofit: http://wookware.org/house/retrofit
MVHR, IWI, EWI, 3G windows, 7kW PV, 16kWh battery, woodburner,
perimeter insulation, extension, garage conversion, UFH, garden veg
MVHR, IWI, EWI, 3G windows, 7kW PV, 16kWh battery, woodburner,
perimeter insulation, extension, garage conversion, UFH, garden veg